Tracking and Visualizing Dependencies Between Projects in TeamCity
Source code for this article: https://github.com/lukasz-lysik/teamcity-dependencies-tree.
Let's imagine, that we have an application which consists of many components. Each component consists of many projects (Visual Studio projects), e.g. Data Access, Data Model, Web, Test, etc. Each project can reference projects in other components. The hierarchy of dependencies can be deep and wide.
To speed up the build process, we would like to know which project was changed during the last commit (check-in) and build only this project along with projects one level higher in the hierarchy (projects that reference this one). There is no need to compile project that are lower in the hierarchy, neither the projects that are two or move levels above.
The first step to implement this would be to maintain a file which contains list of all the projects in the repository with their dependencies. This file could be used by build scripts to figure out which projects should be build.
In this article I'll show how to use Team City to track project dependencies. As an addition I'd like to visualize the dependency tree and display it in Team City. I'll not focus on the other parts, like deciding which projects to run (it will be covered in the next article).
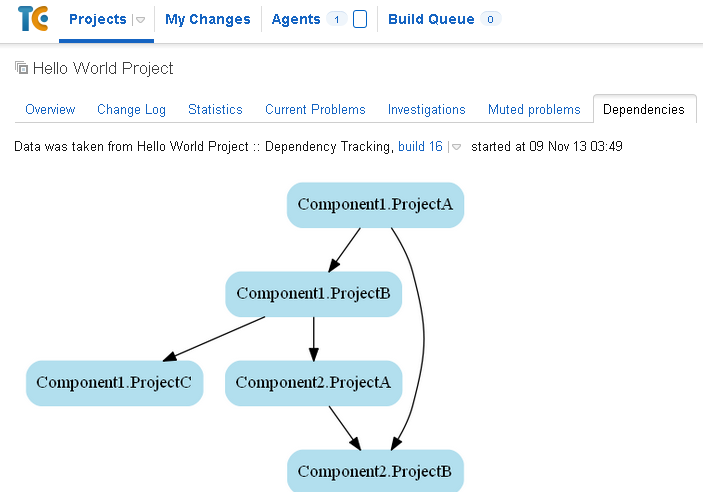
a href="/assets/tree2.png"> Final Result: Project Dependencies in Team City.
Problem Statement
- In a repository (I'll use Git) we have many Visual Studio projects (only C# projects).
- Build server stores all binary files in one folder. All the projects reference assemblies in this folder (there is no project-to-project reference). After a project is built, the assemblies are copied to this folder. This assumption will be important when we will be getting references from *.csproj files.
- We want to generate a file which will contain project dependency tree.
- After a developer adds or removes a reference, we want Team City to update the file.
- We want to use the dependencies file to generate a graphical representation of the tree.
Solution Draft
We would like to have a separate build configuration which will run on each check-in. This configuration will create file with dependencies. The table below presents the problems we want to solve and possible solutions:
| Problem | Solution |
|---|---|
| Setup TeamCity to track changes in *.cproj files only. | Use VCS build trigger filter. |
| Check-out *.csproj only (there is no need to check-out full repository). | Unsolved yet. I've done quick research but I couldn't find a clean way to check-out files with specified extension. We will check-out whole repository. |
| Make the tasks be run by Team City. | I'll create two MSBuild tasks: BuildDependencies and DrawDependencies. |
| Parse *.csproj files | I'll use Project class from Microsoft.Build.Evaluation namespace. I've got the idea from this Stack Overflow answer, which suggests using Microsoft.Build.Engine.Project class (which is deprecated). |
| Draw a tree. | I'll use Graphviz. It has easy to use language, which requires specifying list of edges, rather than full tree. |
Detailed Solution
BuildDependencies task
public class BuildDependencies : Task
{
  public string InputFolder { get; set; }
  public string OutputFile { get; set; }

  public override bool Execute()
  {
    var references = new XElement("Projects");
    foreach (var file in Directory.GetFiles(InputFolder, "*.csproj",
      SearchOption.AllDirectories))
    {
        references.Add(ParseProject(file));
    }

    references.Save(OutputFile);
    return true;
  }

  private XElement ParseProject(string projectFilePath)
  {
    var project = new Project(projectFilePath);
    var assemblyName = project.GetProperty("AssemblyName");

    var output = new XElement("Project");
    output.Add(new XAttribute("name", assemblyName.EvaluatedValue));
    output.Add(new XAttribute("path", projectFilePath));

    foreach (var item in project.GetItems("Reference"))
    {
      if (item.EvaluatedInclude.StartsWith("System")
        || item.EvaluatedInclude.StartsWith("Microsoft"))
        continue;

      output.Add(new XElement("Reference",
        new XAttribute("name", item.EvaluatedInclude)));
    }

    return output;
  }
}- Lines 2-3: I've defined two properties. InputFolder is the folder name which we will scan searching for *.csproj files.
- Line 6-18: The only method which should be overridden when creating custom MSBuild tasks is Execute. This method contains the code which is executed when the task is run. In our case we simply iterate through all the *.csproj files within the directory pointed by InputFolder property.
- Line 22: Use Project class. It is a wrapper for *.csproj files.
- Line 23: Get project's assembly name
- Lines 25-27: Create XML element "Project" and specify it's attributes: name and path
- Lines: 29-37: Iterate though "Reference" nodes in *.csproj file. As I stated before, we don't have project-to-project references so we can skip "ProjectReference" elements. We also skip assemblies which starts with "System" or "Microsoft".
As a result of this task execution I get the following XML file:
<?xml version="1.0" encoding="utf-8"?>
<Projects>
  <Project name="Component1.ProjectA"
           path="F:\Component1\Component1.ProjectA\Component1.ProjectA.csproj">
    <Reference name="Component1.ProjectB" />
  </Project>
  <Project name="Component1.ProjectB"
           path="F:\Component1\Component1.ProjectB\Component1.ProjectB.csproj">
    <Reference name="Component1.ProjectC" />
    <Reference name="Component2.ProjectA" />
  </Project>
  <Project name="Component1.ProjectC"
           path="F:\Component1\Component1.ProjectC\Component1.ProjectC.csproj" />
  <Project name="Component2.ProjectA"
           path="F:\Component2\Component2.ProjectA\Component2.ProjectA.csproj">
    <Reference name="Component2.ProjectB" />
  </Project>
  <Project name="Component2.ProjectB"
           path="F:\Component2\Component2.ProjectB\Component2.ProjectB.csproj" />
</Projects>
DrawDependencies task
The tasks should take previously generated XML file with dependencies and produce *.gv file which will be later used by Graphviz.
public class DrawDependencies : Task
{
  public string InputFile { get; set; }
  public string OutputFile { get; set; }

  public override bool Execute()
  {
    var dependenciesXml = XDocument.Load(InputFile);
    var outputDot = new StringBuilder();
    outputDot.AppendLine("digraph dependencies {");
    outputDot.AppendLine("\tnode [style=\"rounded,filled\", shape=box, color=lightblue2];");

    foreach (var project in dependenciesXml.Descendants("Project"))
    {
      var name = project.Attribute("name").Value;

      foreach (var dependency in project.Descendants("Reference"))
      {
        outputDot.AppendLine(string.Format("\t\"{0}\" -> \"{1}\";", name, dependency.Attribute("name").Value));
      }
    }

    outputDot.AppendLine("}");

    using (var file = new StreamWriter(OutputFile))
    {
      file.WriteLine(outputDot.ToString());
    }

    return true;
  }
}
Most of the code above doesn't need any explanation. However, there are part specific to Graphviz language, which should be described:
- Line 12: Graphviz file header.
- Line 13: Set the default graph appearance: filled, rounded rectangles with lighblue fill.
- Line 21: Attach edge in the form: "Source Node" -> "Destination Node";.
File produced by the above task:
digraph dependencies {
  node [style="rounded,filled", shape=box, color=lightblue2];
  "Component1.ProjectA" -> "Component1.ProjectB";
  "Component1.ProjectB" -> "Component1.ProjectC";
  "Component1.ProjectB" -> "Component2.ProjectA";
  "Component2.ProjectA" -> "Component2.ProjectB";
}
Build Script
Now that we have all needed tasks, let's create MSBuild script:
<Project xmlns="http://schemas.microsoft.com/developer/msbuild/2003"
  DefaultTargets="Build" ToolsVersion="4.0">
  <PropertyGroup>
    <CheckoutDir>F:\TeamCityCheckoutDir</CheckoutDir>
    <OutputDir>F:\Output</OutputDir>
    <GraphvizPath>"C:\Program Files\Graphviz2.34\bin\dot.exe"</GraphvizPath>
  </PropertyGroup>
  <UsingTask TaskName="GetProjectsDependencies.BuildDependencies"
    AssemblyFile="Tasks\GetProjectsDependencies.dll"/>
  <UsingTask TaskName="GetProjectsDependencies.DrawDependencies"
    AssemblyFile="Tasks\GetProjectsDependencies.dll"/>
  <Target Name="Build">
    <BuildDependencies InputFolder="$(CheckoutDir)" OutputFile="$(OutputDir)\dependencies.xml" />
    <DrawDependencies InputFile="$(OutputDir)\dependencies.xml" OutputFile="$(OutputDir)\dependencies.gv" />
    <Exec Command="$(GraphvizPath) -Tpng $(OutputDir)\dependencies.gv -o $(OutputDir)\dependencies.png" />
  </Target>
</Project>
In the PropertyGroup section we define: directory where Team City checks-out repository, output directory, where XML, GV and PNG files should be placed, and path to Graphviz. Also, we need to include our tasks in the build script (using UsingTask).
Our build script have only 3 steps:
- BuildDependencies - which scans all *.csproj files and produces dependencies.xml file.
- DrawDependencies - which produces dependencies.gv file
- Exec command which compiles dependencies.gv into graphical representation: dependencies.png
Final Team City Configuration
- Create build configuration. Create VCS trigger.
- Add one build step which runs prepared MSBuild script.
- In order to see the the tree in Team City we will need to add single artifact which ofcourse will be our dependencies.png file.

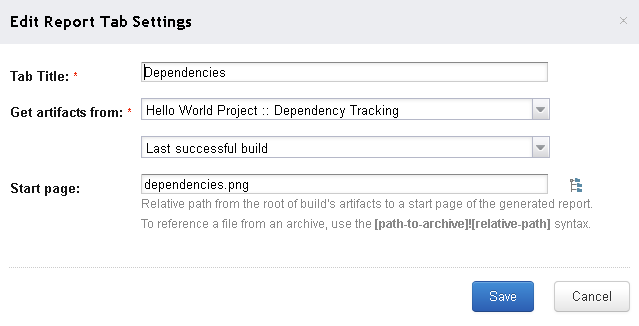
- Use Report Tabs to add new tab
Final result:
Final Result: Project Dependencies in Team City
Let's now change project dependencies. Wait for the build to finish:

And see updated tree:
I hope you'll find this article useful.